 |

|
เป็นไปได้ที่ภาพที่มีโครงสร้างที่ต้องการแต่กลับไม่มีสีที่ต้องการ ในขณะที่สีที่ต้องการกลับไปอยู่ในภาพอื่น จึงเกิดเทคนิคการย้ายสีระหว่าภาพขึ้น
Algorithm การย้ายสีจากภาพหนึ่งไปยังอีกภาพหนึ่งถูกนำเสนอโดย Reinhard et al. [1] ในปัจจุบันได้ถูกนำมาปรับปรุง และนำรวมกับเทคนิคด้วย Machine Learning สร้างเป็นระบบช่วยลงสีแบบ automatic colorization อีกด้วย
ขั้นตอนการทำงาน
มี 2 กระบวนการ
1. การเปลี่ยน Color space
2. การทำ Statistical aligment
การเปลี่ยน Color Space
การเปลี่ยน Color space ก็เพื่อให้เกิดอิสระต่อกันระหว่าง channel ของสี ภาพที่เป็น Digital format ส่วนใหญ่จะใช้ RGB color space [2] ซึ่งจะมี correlation กันระหว่าง channel ของสีคือ red, green และ blue ต้องทำการลด correlation ลง โดย Reinhard et al. ใช้วิธีการเปลี่ยนจาก RGB color space ไปเป็น LMS colorspace [3] ก่อน แล้วจึงเปลี่ยนไปใช้ \( l\alpha\beta \) color space [4] โดยอาศัยสมการ
\( \bf \large \begin{bmatrix}L \\M \\S \end{bmatrix}=
\begin{bmatrix}
0.3811& 0.5783& 0.0402 \\
0.1967& 0.7244& 0.0782 \\
0.0241& 0.1288& 0.8444
\end{bmatrix}
\cdot
\begin{bmatrix}R \\G \\ B \end{bmatrix} \dashrightarrow(1) \)
\( \bf \large L = \log10(L) \\
M = \log10(M) \\
S = \log10(S) \dashrightarrow(2) \)
\( \bf \large
\begin{bmatrix}l \\ \alpha \\ \beta \end{bmatrix} =
\begin{bmatrix}
\frac {1}{\sqrt{3}} & 0 & 0 \\
0 &\frac {1}{\sqrt{6}} & 0 \\
0 &0&\frac {1}{\sqrt{2}} \\
\end{bmatrix}
\cdot
\begin{bmatrix}
1 & 1 & 1\\
1 & 1 & -2 \\
1 & -1 & 0
\end{bmatrix}
\cdot
\begin{bmatrix}L \\M \\S \end{bmatrix} \dashrightarrow(3) \)
นี่คือสมการที่ใช้ในการเปลี่ยนจาก RGB color space ไป \( l \alpha \beta \) color space เพื่อใช้ในการประมวลข้อมูล เมื่อเสร็จแล้วต้องทำการเปลี่ยนจาก \( l \alpha \beta \) color space กลับมาสู่ RGB color space เพื่อให้สามารถนำไปใช้กับ Image editor อื่นได้ต่อไป
การย้อนกลับมาเป็น RGB ใช้สมการดังนี้
\( \bf \large
\begin{bmatrix}L \\M \\S \end{bmatrix} =
\begin{bmatrix}
1 & 1 & 1\\
1 & 1 & -1 \\
1 & -2 & 0
\end{bmatrix}
\cdot
\begin{bmatrix}
\frac {\sqrt{3}}{3} & 0 & 0 \\
0 &\frac {\sqrt{6}}{6} & 0 \\
0 &0&\frac {\sqrt{2}}{2} \\
\end{bmatrix}
\cdot
\begin{bmatrix}l \\ \alpha \\ \beta \end{bmatrix} \dashrightarrow(4) \)
\( L = 10^L \\M = 10^M \\ S = 10^S \dashrightarrow(5)\)
\( \large
\begin{bmatrix}R \\G \\B \end{bmatrix} =
\begin{bmatrix}
4.4679 & -3.5873 & 0.1193\\
-1.2186 & 2.3809 & -0.1624 \\
0.0497 & -0.2439 & 1.2045
\end{bmatrix}
\cdot
\begin{bmatrix}L \\ M \\ S \end{bmatrix}\dashrightarrow(6)\)
การทำ Statistical aligment
Reinhard et al. ใช้การหาค่า Arithmetic Mean และ Standard deviation ของแต่ละ channel ใน \( l \alpha \beta \) color space โดย
\( \large \mu_{l}\) แทนค่า mean ของ channel l
\( \large \mu_{a}\) แทนค่า mean ของ channel \( \alpha \)
\( \large \mu_{b}\) แทนค่า mean ของ channel \( \beta \)
\( \large \sigma_{l}\) แทนค่า standard deviation ของ channel l
\( \large \sigma_{a}\) แทนค่า standard deviation ของ channel \( \alpha \)
\( \large \sigma_{b}\) แทนค่า standard deviation ของ channel \( \beta \)
ขั้นตอนที่ 1 หาผลต่างระหว่างค่าสีของแต่ละ channel กับ ค่า mean
\( l^* = l - \mu_{l}\)
\( \alpha^* = \alpha -\mu_{a}\)
\( \beta^* = \beta - \mu_{b}\)
ขั้นตอนที่สอง ทำการ scale ค่าที่ได้จากขั้นตอนที่ 1 ด้วย \(\large \frac{\sigma^t}{\sigma^s}\) , \( \sigma^t\) คือ standard deviation จาก target image และ \( \sigma^s\) คือ standard deviation จาก source image
\(\large l^{'} = \frac{\sigma_{l}^t}{\sigma_{l}^s} l^{*} \)
\(\large \alpha^{'} = \frac{\sigma_{a}^t}{\sigma_{a}^s} \alpha^{*} \)
\(\large \beta^{'} = \frac{\sigma_{b}^t}{\sigma_{b}^s} \beta^{*} \)
ขั้นตอนที่สาม บวกด้วย \( \mu \) ของ แต่ละ Channel ของภาพ target
\(\large l^{'} = l^{'} + \mu_{l}^t \)
\(\large \alpha^{'} = \alpha^{'} + \mu_{a}^t \)
\(\large \beta^{'} = \beta^{'} + \mu_{b}^t \)
ในการทำงานต้องใช้รูป 2 รูปทำหน้าที่เป็น source (s) และ target (t) โดยที่ source จะเป็นภาพที่ต้องการนำเสนอ และ target คือภาพที่สีจะถูก transfer ออกไปยัง source
เมื่อเสร็จแล้วก็ทำการแปลงกับไปใช้ RGB color space ต่อไป
 |
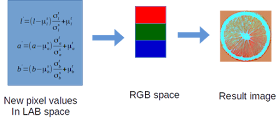
| รูปที่ 1 Color transfer เริ่มต้นด้วยการเปลี่ยน Color space จาก RGB ไปเป็น LAB แล้วทำ Statistical alignment |
 |
| รูปที่ 2 หลังจากได้ค่าของ Pixel ใหม่แล้ว ก็ทำการเปลี่ยน Color Space จาก LAB ไปสู่ RGB ซึ่งจะได้รูปภาพใหม่ออก |
Python code
ความต้องการ
1. Numpy
2. Matplotlib
3. Skimage (option) หรือ PIL
import matplotlib.pyplot as plt
import numpy as np
import skimage.io

def replaceZeroes(data):
        '''
        Reference :
        https://stackoverflow.com/questions/21610198/runtimewarning-divide-by-zero-encountered-in-log
        '''
        min_nonzero = np.min(data[np.nonzero(data)])
        data[data == 0] = min_nonzero
        return data

s_img_1 = skimage.io.imread('pexels-photo-248771.jpeg')
t_img_1 = skimage.io.imread('pexels-photo-440731.jpeg')

ro = s_img_1.shape[0]
co = s_img_1.shape[1]

# normalize
s_img = s_img_1/255
t_img = t_img_1/255

# split RBG channels
sR,sG,sB = np.rollaxis(s_img,-1)
tR,tG,tB = np.rollaxis(t_img,-1)

r1 = sR.reshape((sR.shape[0]*sR.shape[1],1))
g1 = sG.reshape((sG.shape[0]*sG.shape[1],1))
b1 = sB.reshape((sB.shape[0]*sB.shape[1],1))

r2 = tR.reshape((tR.shape[0]*tR.shape[1],1))
g2 = tG.reshape((tG.shape[0]*tG.shape[1],1))
b2 = tB.reshape((tB.shape[0]*tB.shape[1],1))

s_img = np.hstack((r1,g1,b1))
t_img = np.hstack((r2,g2,b2))

a = np.array([[0.3811, 0.5783, 0.0402],[0.1967, 0.7244, 0.0782],[0.0241, 0.1288 ,0.8444]])
b = np.array([[1/np.sqrt(3), 0 ,0],[0, 1/np.sqrt(6), 0],[0, 0, 1/np.sqrt(2)]])
c = np.array([[1, 1, 1],[1, 1, -2],[1, -1, 0]])
b2 = np.array([[np.sqrt(3)/3, 0, 0],[0, np.sqrt(6)/6, 0],[0, 0, np.sqrt(2)/2]])
c2 = np.array([[1, 1, 1],[1, 1, -1],[1, -2, 0]])

# to LMS space
s_lms = np.dot(a,s_img.T)
t_lms = np.dot(a,t_img.T)

# log 10
s_lms = replaceZeroes(s_lms)
s_log10_lms = np.where(s_lms > 0.0000000001, np.log10(s_lms), -10)

t_lms = replaceZeroes(t_lms)
t_log10_lms = np.where(t_lms > 0.0000000001, np.log10(t_lms), -10)

# to LAB space
p1 = np.dot(b , c)
s_lab =  np.dot(p1, s_log10_lms)
t_lab =  np.dot(p1, t_log10_lms)

# to statistics
s_mean = np.mean(s_lab,axis=1)
s_std  = np.std(s_lab,axis=1)

t_mean = np.mean(t_lab,axis=1)
t_std  = np.std(t_lab,axis=1)

sf = t_std/s_std

#apply the statistical alignment
res_lab = np.zeros(s_lab.shape)

for ch in range(0,3):
    res_lab[ch,:] = (s_lab[ch,:] - s_mean[ch])*sf[ch] + t_mean[ch]

# convert back to LMS
LMS_res=np.dot(np.dot(c2,b2),res_lab)

for ch in range(0,3) :
    LMS_res[ch,:] = np.power(10,LMS_res[ch,:])

# convert back to RGB
d = np.array([[4.4679, -3.5873, 0.1193],[-1.2186, 2.3809, -0.1624],[0.0497, -0.2439, 1.2045]])

est_im = np.dot(d,LMS_res).T
result = est_im.reshape((ro,co,3)); # reshape the image

fig=plt.figure(figsize=(30,10))
fig.add_subplot(1,3,1)
plt.imshow(s_img_1)
plt.title('Source')
plt.axis('off')

fig.add_subplot(1,3,2)
plt.imshow(t_img_1)
plt.title('Target')
plt.axis('off')

fig.add_subplot(1,3,3)
plt.imshow(result)
plt.title('Result')
plt.axis('off')

plt.show()
ทดสอบ
ภาพเหล่านี้มาจากเว็บไซต์ https://www.pexels.com/search/nature/ ภายใต้ลิขสิทธ์ Creative Common Image (https://www.pexels.com/creative-commons-images/)
จากซ้ายไปขวา คือ source image (receiver ) ,target image (donator ), result image
ข้อบกพร่อง
ยังพบข้อผิดพลาดเกิดขึ้นได้ในบางภาพ (ไม่ทราบสาเหตุ) การเปลี่ยนไปใช้ภาษาอย่างเช่น Matlab หรือ Octave ให้ผลลัพธ์ที่แน่นอนและมี performace ดีกว่า
เอกสารอ้างอิง
[1] Erik Reinhard, Michael Ashikhmin, Bruce Gooch and Peter Shirley,
'Color Transfer between Images', IEEE CG&A special issue on Applied
Perception, Vol 21, No 5, pp 34-41, September - October 2001
[2] https://en.wikipedia.org/wiki/RGB_color_space
[3] https://en.wikipedia.org/wiki/LMS_color_space
[4] https://en.wikipedia.org/wiki/CIELAB_color_space


ไม่มีความคิดเห็น:
แสดงความคิดเห็น